Search

Oregon Fall 2019

Table of Contents

Situation: You want to do something, but it seems somehow…wrong.

Your solution to the problem – Look around and observe what everyone else is doing.

They all appear to be looking straight ahead, just…waiting.

Welcome to the western terminus of the Dundee Bypass, where traffic has obediently stopped at the bottom of the exit ramp, watching traffic on 99w go by.

In the left-hand turn lane, as traffic law goes, drivers must wait for the light to turn green. This may seem unreasonable to you, but there you have it.

Red stop-light
Dude! Turn already!

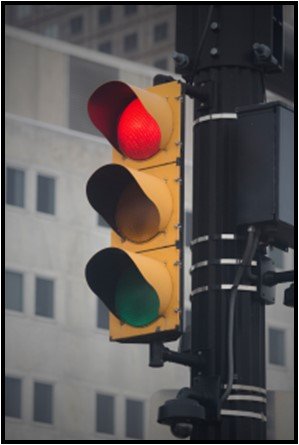
In the two right-turning lanes, things are murkier, maybe even confounding. At least, this is how it seems as drivers in both right-turning lanes wait interminably for the light to change to green even when no one is coming.

For those of you who were thinking of checking your driver’s manual to see what exactly is the rule for right-turning traffic at a red light – especially if the red light is in the shape of an arrow, I, your friendly neighborhood Realtor, have done it for you. You’re welcome!

The scoop: If you are the inside lane, you may turn right on a red regardless of whether the redness is contained in a circle or if it is more artistically rendered in an arrow shape. You have only to wait for a break in traffic to make your move.

The right-hand (outside) lane, same deal only notice: Your 99w westbound lane is dedicated to you, merging into the through lane after about 100 feet. So, yes, you turn right and GO, even if the light is a red arrow, then you merge leftward into one lane with the through traffic, just as if you were merging onto a highway. Because you are.

Please note, inside lane elitists – you ARE required to give room for the mergers to merge. Think zipper, not Panzer Parade.

Brought to you by the Oregon Driver’s Manual, page 13.

Next time, we will take up the Wild World of RoundAbouts.


continued below...

Refer-a-Friend Rewards Program

Picture of Lisa Baker
Lisa Baker

Principal Broker | REALTOR
RE/MAX Equity Group

It’s time for something nice to arrive in your mailbox. Starbucks coffee, Subway sandwiches or dinner at Red Robin. Yes! It could happen to YOU!

Just refer your friends to me and I’ll not only take great care of them as they shop for a house or market their houses with me, but I will send You a gift card for something delicious, too!

Is that a great deal or what?!

Countertop Caulking Know-How

Over the years, especially if you have a newer house that is still settling a bit, you may notice that the caulk that fills the gap between your kitchen/bath counter has begun to split, crack or crumble. It’s easy enough to ignore, but water from the sink at some point will be able to breach the resulting void and get to the drywall, where it will mold.

You could call your friendly neighborhood handyman to remove the old caulk and apply the new (I have referrals if you need them) or you could tackle this job on your own.

For DIYers:

Begin by removing the old caulking. Your local hardware store has tools for this that make the job much easier. If the caulk is already crumbling off, scraping it off and out of the crevice with a 5-in-1 painter’s tool or putty knife should be relatively easy. If it is a fighter, which is common, and you have a readily scratchable counter/backsplash you could try Goo Gone or other caulk removal product to soften it first. Beware, this can be very messy. If you use a caulk softener, spray it and then leave it for the amount of time given by the manufacturer.

To begin the actual removal on a silicone-only product (no sand), cut it wherever you want to begin with a utility knife or any sharp edge, and then pull it out, using the 5-in-1 to loosen it as you go. The older the caulk, the less likely it will pull out in one beautiful piece (sorry!). The main thing is to be patient enough that you don’t gouge backsplash or counter – slow and go is best.

Once it’s removed, you can run a new bead. Some folks use masking or painter’s tape to define where the line will be and make clean up easier. But you may find that applying the tape straight the first time is challenging and time-consuming.

Use a caulk gun rather than a squeeze tube. It’ll save your hands! Cut the tip on the diagonal – the smallest possible opening, otherwise all the excess will make the project messier and require more stopping. Begin your line, applying no more than 3 feet at a time. To stop the bead, pull the stopper on the gun to relieve the pressure so it doesn’t keep pouring out material while you’re stopped. You can smooth the line and remove excess just by wetting your fingertip and running it lightly over the top of the bead. Be aware that the more you mess with it, the worse the finish gets. There are several great products for removing excess and smoothing – if you buy a wedge/triangle kit with several different angles, one of them will probably fit your project.

Once the line is smooth, you’re done!

Choice of materials: There are plenty of fights about products. The main thing is to be sure that the product is labeled for what you’re doing. Some say silicone is best for most jobs because it flexes where acrylic does not, so cracks from settling do not appear as readily. You can match your product to your backsplash or just use white. For granite, you might consider a sanded silicone for a more natural look.


Apples n’ Oranges

This time of year, fruit choices thin out a bit, farmer’s markets close down for winter and you’re stuck with whatever the stores have on hand.

So it’s all the more important that whatever you take home is the best quality, right?

Here’s a primer on picking fruit – particularly apples and oranges – what to look for and what to leave behind, all data stolen shamelessly from More Reputable Publications than this one and from my local produce guy.

Apples: There is only one harvest season for apples in the northwest, and that’s August-October. In the produce department in April and May are apples that were harvested during that time, so don’t be thinking they’re fresh from the tree. But because apples have a long shelf life, and continue to live off their starch content for a long time after harvesting, there’s no reason they can’t be excellent.

Honeycrisp: If you’re going to pay up to $2.99 per pound, these babies better be spectacular. How to be sure? Make sure you choose apples with all three colors: green, yellow and red. If the green is gone and it’s overly dominated by yellow, it’s over-ripe. Done, Finito, stick a fork in it.

Fuji: The sweeter Fuji apples have the yellow background with red streaking.  Those with the green background with red streaking are more tart.  In general, the more vibrant the red, the higher the sugar content. So, choose accordingly.

Granny Smith: Known to be both tart and crisp, they can also be mushy if over-ripe and over-tart if under-ripe. Choose a firm apple and then, if a sweeter taste is preferred, leave it on the counter for a few days and it will sweeten.

Pink Lady: Look for strong pink/red color, firm skin.

Red Delicious: According to Produce Experts, there is no such thing as a good Red Delicious apple. They will go so far as to say that they are a fraud perpetrated on the people. The media apparently agree. A sampling of headlines: “The Long Monstrous Reign of the Red Delicious Apple is Over” (New York Times), “The Red Delicious is an Apple Atrocity, a Joyless Snack, a Crime Against the Apple…It has no business in the mouth” (The New Food Economy”. They suggest limiting their use to fall wreath-making.

Avoiding mealy apples: Feel the weight of the apple. If it seems heavy for its size, it’s good. If it feels light, the cells have already emptied of moisture – mealy! Over time, my produce expert says, you’ll get a feel for heavy and light.

Squeeze the apple gently, if there’s “give”, it’s mealy. If juice begins trickling down your arm, you have squeezed too hard and should leave the area immediately before the produce police git you.

Best storage: A high humidity crisper drawer – you can even add humidity using a wet paper towel in the bottom of the drawer. A carboard box in your basement is a good place, each apple wrapped in newspaper. At room temperature, the fruit will continue to ripen.

Oranges: Like apples, the weight of the fruit is the thing. The lighter the fruit, the older and drier it is. Look for oranges that are heavy for their size – means they’re juicy! Also, look for a smooth, thin skin that is firm. Don’t judge by color since some oranges are dyed and Valencias can be green-tinged and still be fully ripe.

Navel oranges are best from mid-winter to early spring and Blood Oranges are at their peak from early winter until early spring. Valencias are late-spring, mid-summer harvests.

Unlike apples, oranges do not continue to ripen on the counter, so it makes the best sense to buy fully-ripened fruit. They will keep a week or so on the counter. Beyond that, the high humidity crisper drawer is your best bet.